Sunday, August 7, 2011

Rajma - Chawal

This may be a very standard recipe but like the dal tadka, I've made it so often that I've kind of gotten to a stage where I have a fool-proof recipe to follow and it comes out well all the time. Even if I am at work anf giving instructions to VJ over the phone, it still turns out good. Now that's something to be proud of I guess :)

A few thumb-rules I've learnt about rajma:
  • Soak it overnight, preferably in warm water. Throw away this soaked water
  • Rajma has more of ginger and less of garlic in it. Some people even avoid using garlic
  • You need lots of spicy green chillies for this
  • Rajma also uses very little tomato in its recipe
  • Use only MDH Garam Masala. I do not use any other brand and I swear only by MDH. It has the closest authentic taste to home-made garam masala. And this is a tip I learnt from a punjabi roommate of mine whose mom makes garam masala at home. So I believe in it whole-heartedly
  • Slow cooking the rajma in the masala is the best way to get the closest restaurant/dhabha kind of taste
  • Making rajma is not difficult at all, its actually a very easy recipe since its a staple punjabi curry/dal that's made very often at home

OK...onto the ingredients and the recipe itself.


Ingredients:
Rajma - 2 cups
Onions - 2 meduim size
Tomato - 1/2 to 1 medium size (if you're using Roma tomatoes, although they are tiny, use just 1)
Green chillies - 4 spicy hot
Ginger - 3 inch piece
Garlic - 1 clove
Chilli powder - 2 tsp
Dhaniya powder - 1 tsp
Garam masala - 3 tsp
Cumin - 2 tsp

Method:
1. Pressure cook the soaked rajma with enough water (double its amount, in this case 4 cups) for 2 whistles and then 15 mins on LOW. Switch off and leave on hot stove for the pressure to release.
2. Cut the ginger into thin long strips, crush the garlic, slit the green chillies, finely chop the onions and tomato.
3. Heat oil in a thick bottomed vessel and splutter jeera in it. Then add the onions and fry for two mins.
4. Now add the garlic, ginger and green chillies and fry until the onions are a little browned around the edges. Adding salt at this step will help fry the onions quicker.
5. Add tomatoes and cook until it is well blended. Then add all the masalas, including the garam masala. Fry for a minute.
6. Add 1 to 2 cups of water (use the water that is left over from the rajma in the pressure cooker). Cover and cook for 15 to 20 minutes. Make sure there is enough water.
7. Add the rajma to this, add salt and check for the seasoning. If the spices are lacking, you can add more garam masala at this stage. Mix well until well blended.
8. Set on LOW, cover and cook for 45 mins. Add more water in this stage based on how much of gravy you would like.

Serve with plain rice or jeera rice, pappad and plain dahi (yogurt) seasoned with jeera powder and salt.

Source:
I pretty much made up this recipe as I tried different variations. I don't have a particular source to cite.
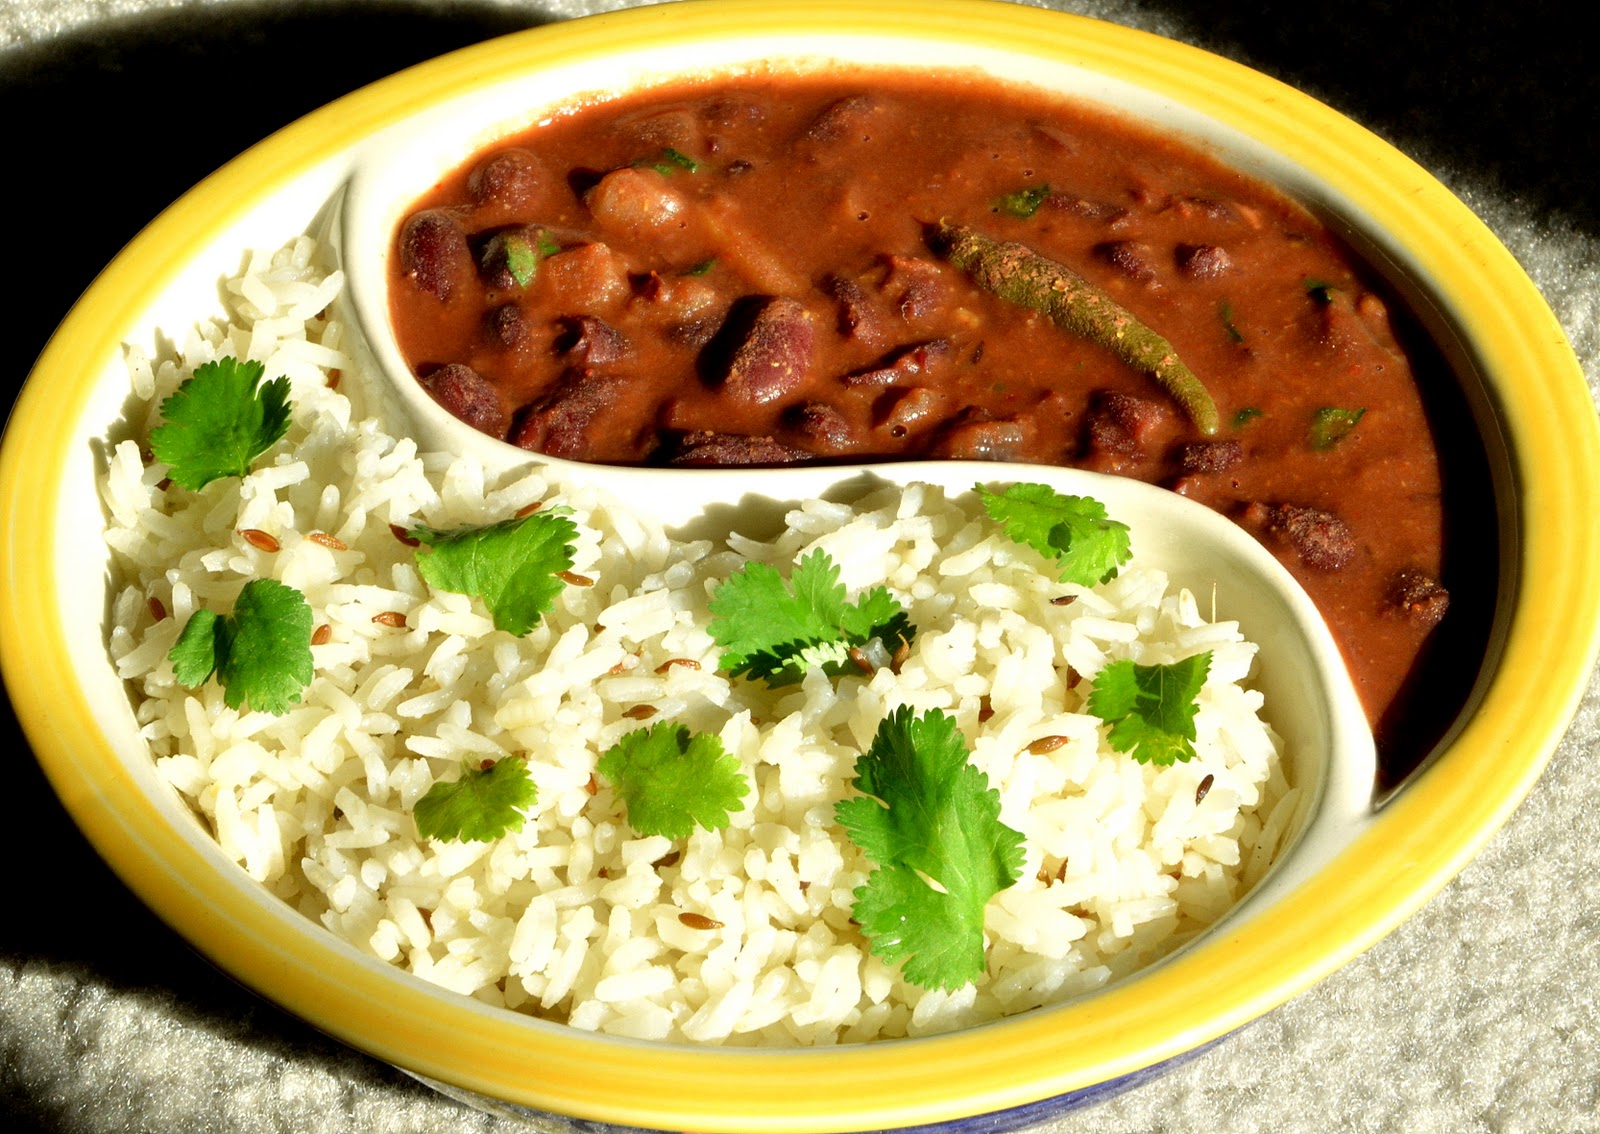

Pics...you know the line...once I get home. Just one more week to go! Yay!

Update: Added pics...I got some awesome dishes for my food blog! :)

Monday, August 1, 2011

Poori & Bhaaji

This one's for my mom :)

Having to get two kids and a husband (with a good breakfast in their tummy and a tasty lunch packed for each) out of the door by 7 AM everyday for 15 years is no joke. That's why weekends were special when she took out extra time to make special treats like poori & bhaaji for us. To this day, when we're travelling and eat breakfast outside...I always order poori-bhaaji. Or poori-masal like the say in Tamil Nadu. So this recipe is for those typical family-weekends when I used to wake up to the smell of mom and dad making poori & bhaaji. Oh, how I miss home!


Bhaaji
Ingredients:
Potatoes - 8 or 10 medium sized
Onion - 2 medium sized
Tomatoes - 2 or 3 medium sized, based on tanginess ( I use hot house tomatoes usually)
Ginger - 3 inch piece
Green chillies - 4 to 6 spicy hot
Turmeric powder - 1/2 tsp
Red chilli powder - 1 tsp
Dhaniya powder - 1 tsp
Mustard seeds - 1 tsp
Urad dal - 2 tsp
Chana dal - 2 tsp
Oil - 3 to 4 tbsp
Salt to taste
Lemon juice - 1 tsp
Coriander leaves (finely chopped) - 1 tbsp

Method:
1. Boil potatoes in the cooker for at least 2 whistles. Cool, peel and mash well until it is smooth with few or very little lumps. Add salt to taste and mix well.
2. Chop the onions and tomatoes into small pieces. Cut the ginger into thin strips. Slit the green chillies.
3. Add 3 tbsp oil in a thick bottomed vessel and splutter the mustard seeds in it. Add the ginger and green chillies. Do NOT brown them. Mix for 30 seconds and immediately add the onions. This recipe does not require the ginger to be browned. The ginger has to retain some of its natural flavor to blend into the potatoes.
4. Fry the onions until they are transparent and very lightly browned around the edges. Now add the tomatoes and fry for 5 minutes. Again, you don't have to fry it until the oil separates. The nice thing about this recipe is not to fry or brown everything. The tomatoes also need to be a little tangy to give the potatoes that nice, unique taste.
5. Add all the masalas and mix for a minute. Make sure you don't burn the curry at this point.
6. Add 1/2 a cup of water and salt as needed. Taste to make sure the seasoning is right. The water is optional and it helps to mix the curry and the potatoes together. Otherwise it may be difficult to fold the potatoes into the curry. Switch off the stove.
7. Now add the mashed potatoes and mix well until it is well blended with the curry. At this stage you can add more water if needed. Taste to make sure the salt is right. Remember, we also added salt to the potatoes separately when we mashed them.
8. Let it cool for sometime. All the flavors would blend in well during this stage and it is important for the bhaaji to cool before adding the final seasoning.
9. Take the remaining 1 tbsp oil in a pan or small kadai. Fry the urad dal and chana dal in it without burning them. The trick here is not to wait until the oil is smoking hot. Just wait for a minute to heat the oil and immediately add the dal and let it slowly fry. Slow is good in this step. If you fry the dal in the initial step, it will not retain its fried, crispy, crunchy taste. That's why I like to fry it separately.
10. Now top the bhaaji with the dal fry tadka and mix well. Just before serving, add the lemon juice and top it with some freshly cut coriander leaves (optional).

Poori
Ingredients:
Whole wheat flour (atta) 2 cups
Coarse grained semolina (rava) - 2 tbsp
Sugar - 1 tbsp
Water as needed
Oil, for deep frying

Method:
1. Sift the flour and semolina along with the sugar in a sieve. Sifting just helps to mix it all well. The semolina and sugar helps to keep the pooris puff-up and remain so for slightly longer than when using just plain flour.
2. Add water as needed little-by-little and knead until the dough is firm. It should not be sticky.
3. Divide the dough into lemon sized balls, dust in dry flour and set aside.
4. Heat the oil in a deep kadai until just before smoking hot.
5. Using a rolling pin and more dry flour as needed, roll out the balls into round thick pancakes. It has to be thick otherwise it will not puff up. Don't roll them out as thin as phulkas or chappatis.
6. Test whether the oil is hot enough with a small pinch of the dough. It should rise up immediately and not stick to the bottom or struggle to rise up.
7. Slowly slide in one pancake and press-down slightly into the oil with a slotted spoon until the pancake puffs up. Flip over and fry for 30 seconds. Flip over again and fry for 10 seconds.
8. Drain excess oil and remove using the slotted spoon onto a plate with paper towels. Repeat step 7 for each pancake. Serve immediately while hot and puffy with the bhaaji.

Source:
Mommy dearest :)

I do not want to end on the same lame line as the previous ones...but seriously, pics to follow soon once I get back home! 10 more days...yay!

Alu/Gobhi Mutter - Gravy

My only excuse for yet another potato based recipe is VJ. He does NOT eat any other vegetables and it's been quite a task for me to convince him to try. It's a lost battle for the past 27 years but I have not given up hope. And so hasn't he 'cause he thinks that this recipe is a testament of the fact that he has changed my ways. Total BS! But to be fair, this is a simple and easy recipe on hectic weekdays when we have a quiz, a paper, case-studies...the whole enchilada on one school day.

But this recipe was originally meant for Gobhi Mutter which incidentally I love and VJ absolutely hates (he says cauliflower stinks). So you can make this with either vegetable you want. I've tried it both ways and its good. Although for the gobhi mutter, I saute the gobhi with a little oil to remove excess moisture. Otherwise the curry tends to get watery over the days as the gobhi leaves water when stored.


Ingredients:
Potatoes - 6 or 8 medium sized ones
Green peas - 1 cup
Ginger-Garlic paste - 1 tsp
Green chillies - 4 spicy hot
Tomato - one medium sized, pureed in a blender
Turmeric powder - 1/4 tsp
Red Chilli powder - 1/2 tsp
Coriander powder - 1/2 tsp
Amchur powder (dried mango powder) - 1 tsp
Garam Masala powder - 1 tsp
Cumin seeds - 1 tsp
Oil - 2 tbsp
Salt to taste
Water as needed

Method:
1. Boil the potatoes. Cool, peel and cut into cubes.
2. Wash the peas in running hot water and soak them in hot water for about 15 minutes. If you are using fresh peas, cook them in water and a pinch of turmeric. The turmeric helps to keep the green color of the peas.
3. Slit the green chillies. Add the oil in a think bottomed vessel and splutter jeera in it. Add the ginger-garlic paste and the green chillies. Fry for 1 minute until the raw smell of the ginger-garlic paste fades away.
4. Move the vessel to a cold stove, add all the masalas and blend well. Move vessel back to the hot stove and immediately add the tomato puree. Do NOT add any water at this stage.
5. Keep the stove on MEDIUM-LOW and cook the tomato puree until oil separates. After that add 1/2 to 1 cup water based on how much gravy you desire in the curry.
6. Add the peas and potatoes, salt as needed and taste to make sure that all the seasoning is right. Mix well and add more water if needed at this stage.
7. Cover and cook on LOW or MED-LOW for 20 minutes. Make sure there is enough water to let it cook for this long. Otherwise you will end up burning the curry.
8. Another variation is to just toss in the peas and potatoes into the cooked tomato paste puree so that they are lightly coated. This would give a relatively dry version of the same dish.

Source:
Adapted from Sanjeev Kapoor's recipe here:


Pics to follow soon once I get back home! :)
Updated finally with pics!

Saturday, July 30, 2011

Tonight's dinner!

1 amazing rice + 1 amazing curry = An absolutely amazing weekend dinner :) Thank you Ansh!


P.S. I added a pinch of turmeric powder, cashewnuts & raisins to the rice.

Wednesday, July 6, 2011

Mashed Potatoes - Desi Style

I love potatoes. Period.

But thanks to my genetic makeup (I can pile on the pounds with ease!) and the added high carb content of potatoes, I make an effort to avoid them as much as I can. I even have a rule that helps me stay in control: if I can remember the restaurant, place, month and date of the last time I had them, then it's too early to eat potatoes again. Over the years I've extended this rule to anything and everything from brownies to cheese cake to apple pie to pizza etc. It works well for me and my eating binges have considerably been in check. So far at least.

My potato craving set in quite recently when I sprained my ankle and could not stand long enough to cook anything. So I ended up buying a 2 pound bag of potatoes. Now this was way back (on May 31 to be exact) and I used up almost half of it to make oven-roasted potatoes. After that, although I was sufficiently recovered, I traveled all over Europe for 3 weeks and had no further opportunity/need to cook. Last week, after a particularly long day at work, I pulled a muscle in the same ankle once again and had to rest at home. So I re-visited the old bag of potatoes and decided to ignore the rules for once. Another reason was the amazing mashed potatoes with button mushrooms and zucchini stir fry that I had in Paris the weekend before at "L'Autour d'un Verre" on rue de Trévise. Hands-down, the best mashed potatoes I've ever had. Which of course was expected I guess given that I was in France.

So all of these factors combined led me to experiment with mashed potatoes. I looked up recipes online and found out that mashed potatoes is quite a lot of work and called for many ingredients that I was missing. I decided to just go with my guts and experiment a little.


Ingredients:
Potatoes - 8, medium size
Garlic - 2 to 4 cloves depending on size
Ginger - 2 inch piece
Butter - 2 to 3 tbsp
Chaat masala powder - 3 tsp
Salt to taste

Method:
1. Wash the potatoes and cook them (whole, with skin) with water in a big vessel. About 20 minutes on high. Check with a fork or knife to see if its done. Alternatively, cooking them in a pressure cooker would also work (2 whistles).
2. Drain, peel and mash well until it is smooth without any lumps. You can also add a little water/milk to make the consistency right.
2. Chop the garlic and ginger into small pieces. Heat butter in the vessel and fry the garlic and ginger until they are well browned.
4. Add the mashed potatoes and mix well. Now add the remaining butter and blend it into the potatoes. You can also add water/milk to make the consistency right at this step.
5. Now add the chaat masala and salt. Taste it and add more as needed. Can be garnished with finely chopped coriander leaves if needed.

Alternatively, you can also mix the salt and masalas to the potatoes while mashing them and top it with the fried garlic and ginger and then baking for about 15 minutes in the oven at 250 F would also be a good twist. Experiment away! :)

Tastes real good eaten with vegetable stir fry (I personally prefer zucchini, button mushrooms and spring onions). But for lazy days, it tastes amazing with just rice or roti. Believe me!

Source:
Basics of the recipe inspired from this one on Food Network

Saturday, July 2, 2011

Handi Paneer

This is another old recipe that I remember when Amul Paneer had been newly launched in India. It took awhile for it to reach my small city down south. Those were the days when finding things like paneer in Pondichery was difficult and I had to bug my dad to take me all the way into town to buy it from the small store near Manakula Vinayagar temple. I forget the name of the store though. They were one of those stores where you could buy cube cheese, tomato puree and some of those off-beat stuff which were difficult to even explain to the small store around the street corner.

So anyways, this was long ago before I learnt how to make paneer at home. I noticed the recipe behind the packet and decided to follow it to the T. One, it did not call for too many ingredients and two, I had all of them at home. There was no need to bug my dad to take me shopping again.

I bought some paneer from the Indian Store last Diwali and VJ wanted to eat something really spicy. I had a couple of green bell peppers at home and decided to tweak the recipe a bit. Surprisingly I found the recipe online on the Amul website. I make it quite often when we have paneer at home and it's also become quite a favorite with VJ.


Ingredients:
Paneer - 250 gms
Green bell peppers - 2 to 3
Onions - 3 medium size
Tomato - 1 medium size
Green chillies - 2 to 3 depending on how spicy they are
Ginger - 1 inch piece cut into strips
Bay Leaf - 1 medium size
Curd - 1/2 cup
Red chilli powder - 1/2 tsp
Turmeric powder - 1/2 tsp
Garam masala powder - 1/2 tsp
Pepper powder - 1 to 2 tsp
Oil - 2 to 3 tbsp
Cumin seeds - 2 tsp
Coriander leaves - optional

Method:
1. Set the paneer out to defrost. It also helps to immerse them in warm water for about ten minutes. This makes the paneer absorb the gravy and masalas better.
2. Cut the onions, tomato and green bell peppers into 1 inch square pieces. Slit the green chillies.
3. Add oil in a big thick bottomed vessel and splutter the cumin seeds. Add the onions and fry until they are transparent and lightly browned in the corners.
4. Then add the cut bell peppers and fry for another 5 minutes until they begin to soften lightly.
5. Move the vessel over to another stove that is not hot and add the ginger, chilli powder, turmeric powder and garam masala. Mix well and move it back to the hot stove.
6. Add the tomatoes, green chilli and tej patta. Mix and let it cook for about 10 minutes until the tomatoes are completely cooked.
7. Add the curds and cook until it is well blended and starts to leave oil.
8. Add water as needed, paneer and salt. Mix and cook with a lid for about 15 to 20 minutes.
9. Switch off the stove. Now add the pepper powder and coriander leaves. Cover and let it sit on the stove covered.


Source:
The website also has some other nice paneer recipes that you can try.

P.S.: My photographer is in the US and I am in Germany for our respective summer internships, so pics will be added soon once I get back home to the US and my photographer :) 
P.P.S.:Updated with pics!!!

Thursday, April 7, 2011

Paneer Stir Fry

This recipe was invented when I had reached the heights of craving for some paneer dish at the hour of midnight. Which means that I had minimum ingredients at hand..:) This dish comes best when prepared on a dosa tawa.

Ingredients:
1) Diced Paneer - 250 gms
2) Garam masala Powder - 1tsp
3) Chat masala - 1tsp
4) Haldi Power - 1tsp (Just for the color)
5) Lemon juice - 1/2 tsp
6) Oil as required for stir fry
7) Salt as required
8) Coriander leaves for garnishing

Procedure:
1) Heat the tawa and saute Paneer in it with a few drops of oil till the sides turn slightly brown and crispy. Remember to drain out exces water from paneer before you put it in the tawa, else it will turn soggy.
2) Now add all the masala, lemon juice and salt.
3) Toss well and remove the tawa off the heat.
4) Transfer contents into a bowl and mix in the coriander leaves.
5) Can be served with tomato sauce

Note: Paneer tends to harden once its cold. So this dish tastes best when served hot!