Friday, September 23, 2011

Palak Paneer

I love spinach and various other leafy greens. One of my all time favorites is amma's keerai chaaru and keerai poriyal. But the greens we get in Southern India is actually thandu keerai or amaranth greens. I discovered spinach or pasalai keerai quite late as it wasn't that easily available in our little town. I've tried palak paneer in various versions when I began my cooking spree at the age of 12. But my favorite recipe that felt as close to the dhabas or restaurants of Northern India was a recipe from a friend's mother. Although I don't remember the recipe to the 't'; I tweaked it quite a bit and use it as my standard palak paneer recipe.


Ingredients:
Palak/Spinach - 2 bunches (fresh) or 1 medium bag (frozen)
Paneer - 250 gms
Onion - 2 medium
Tomato - 1 medium
Garlic - 2 cloves
Ginger - 1 inch piece
Green chillies - 2 (spicy hot)
Red chillies (dried) - 2
Red chilli powder - 1/2 tsp
Dhaniya powder - 1 tsp
Ghee - 1 tsp
Oil - 2 tbsp
Methi seeds and coriander seeds - a few (optional)
Cumin/Jeera - 1/2 tsp (optional)
Cream - 1/2 tsp
Salt - to taste


Method:
1. Steam cook the spinach (fresh) with just a sprinkling of water and let it cool. If using frozen spinach, cook on HIGH in the microwave for 6 to 8 mins and let it cool.
2. Grind the onions, garlic, ginger and green chillies into a paste. Puree the tomatoes. After the spinach has cooled, blend until smooth. I use my Magic Bullet for all of this and it's ideal for students. I "heart" my Magic Bullet.
3. Heat the oil in a thick bottomed vessel and add the onion-ginger-garlic-green chillies paste. Fry until lightly browned and all the rawness of the onions is gone. Now add the tomato puree and let it cook until oil separates. Add the masalas and cook for 2 mins.
4. Then add the pureed spinach, season with salt (to taste) and cook for a maximum of 5 minutes. It is important not to overcook the pureed spinach as it will lose all its nutrients. Add the paneer to the gravy, stir it slightly, cover and let it sit on the hot stove.
5. In the meantime, heat the ghee in a small kadai and splutter the jeera, methi and coriander seeds. Then add the red chillies and fry until it starts losing its red color and turns a little brown. Top the palak paneer with this tadka and add a swirl of cream around it and serve hot with phulkas or steamed rice.

Source:
A friend's mom's recipe.

Friday, September 16, 2011

Channa Chaat Salad

It's been 4 loooooooong months since I hit the gym; all thanks to having to move to Germany where I could never find the time to work out (read as: lame excuses). And this term has NOT been easy on me at all. Quite the opposite; I hardly find time to make a decent meal. So it was a welcome relief to go to the gym this week. I was having a particularly harsh and bitter week with respect to work, school and the umpteen other things I've taken up and it got too much too handle. When I'm stressed out, the only way to de-stress is to work out. And this is something I learnt from VJ. After quite a rigorous work-out today, I got a call from Karan as I was walking to the car in the parking lot. He wanted a recipe! From me! It made me go "awww" :)

So Karan...here goes the recipe for you. It'a minimum fuss recipe that's healthy as hell and tasty as heaven :)


Ingredients:
Channa dal (white or black) - 1 cup
Red onion - 1 medium or 1/2 of a big one
ROMA Tomatoes - 2
Potato - 1 medium
Green chillies - 1
Coriander (freshly chopped) - 1 tbsp
Lemon juice - 1 tsp
Chaat masala - 1/2 to 1 tsp
Chilli powder - 1/4 tsp
Salt - to taste

Method:
1. Soak the channa dal for 6 hours and cook with 1 cup water in a pressure cook. Wash the potato thoroughly and place it in the same cooker in a separate bowl or within the dal and cook for 2 whistles, take off hot stove and let the pressure release.
2. Remove from the cooker and once it's cooled down I let it sit in the fridge till evening. This helps to keep the channa dal and potatoes firm enough so that the salad doesn't get to a mashed up semi-solid texture.
2. Finely chop the onion, tomatoes, green chillies and coriander.
3. Take the potato and channa dal out of the fridge. Peel the potato and cube into pieces. It's not necessary to bring it back to room temperature but you can choose to do it that way. I like this salad a little cold especially on sweaty summer nights. It makes for an amazing meal in itself.
4. Take a large salad bowl (or any large bowl; you can also just use the cooker itself). Place the chickpeas in it first then add the onions, tomatoes, green chillies, coriander, chaat masala, red chilli powder and salt. Toss until the flavors are blended. Check to make sure the seasoning is right.
5. Now add the potatoes and lemon juice and toss once more albeit lightly to make sure that you don't disfigure the potatoes. Check again for seasoning and you're ready to dig in. You can (or rather should) vary the seasoning to your taste.

Personally for me this is a nice meal in itself especially after a work out. It used to be a favorite during last Spring. I still love it but hardly get the time to make it anymore. But apparently it goes well with puris as per Karan's update :)

Source:
None to cite. I pretty much made this up as I went. If you have a concern, leave a comment and I'll get back to you.

Sunday, September 11, 2011

Amma's Rasam + Beans Poriyal - Virundhu Saapadu Series

Every Vinayagar Chaturthi it's a dad-daughter ritual between me and appa to go buy the Vinayagar from the market place. Every street has rows over rows of Vinayagar murtis in different avatars. And I always chose the fattest and cutest Vinayagar. Appa would carry him home on the pooja thaali and thus begins each Vinayagar Chaturthi. I've lost count of the number of Vinayagar Chaturthi's I've missed since I moved out. This year was particularly difficult because I've had a long period of home-sickness that doesn't seem to go away; even with my sister visiting me so often. So this year, I made a promise to myself that I would try and re-create the "virundhu saapadu" that amma and appa make for every festival at home. This is the first post in that thread and I sure do hope to see more in the coming weeks.

This weekend Kupy got me started with the rasam + beans poriyal combo which is a go-to lunch for me when I'm sick. Which by the way I am though; caught a nasty cold over the end of the week and had to miss school and work on Friday. So Kupy decided to make amma's famous rasam and we picked up some beans at the Farmer's market on Saturday; Sunday lunch was thus fated in a way.

What follows is ONE of the ways to make rasam and personally for me, the ONLY way to make rasam :)


Rasam
Ingredients:
Tamarind - lemon sized ball or 1/2 teaspoon instant paste
Tuar dal - 1/4 cup
Tomatoes - 1 roma tomato
Garlic - 2 cloves
Coriander leaves - 1 tbsp
Mustard seeds - 1/4 teaspoon
Hing/Asafoetida - a generous pinch
Ghee - 1 teaspoon
Rasam powder - 2 tsp
Pepper powder - 1/2 tsp
Water - as needed
Salt - to taste

Method:
1. Soak the tamarind in some warm water for about 15 - 20 mins. Crush and extract the tamarind seeds and pulp to get tamarind water (should measure to about 1 cup). Alternatively, take a cup of water and dissolve upto 1/2 tsp tamarind paste.
2. Place a rounded bowl on the stove with the tamarind water and some salt. Wait for the first boil.
3. Cook the tuar dal in enough water (1/2 to 3/4 cups) and mash well with a rounded spoon.
4. Add the cooked tuar dal to the tamarind water along with rasam powder and pepper powder.
5. Crush the garlic. Cut the tomatoes into large pieces and microwave for 1 to 2 mins on HIGH. Add this to the mix along with the crushed garlic. Add salt to taste and let it boil for about 10 mins on MEDIUM. By this time all the spices should have blended well. Taste to make sure that the flavoring is right.
6. Take ghee in a small kadai and splutter mustard seeds in it. Then add the hing and curry leaves. Add this tadka over the rasam and stir it in. Garnish with freshly chopped coariander leaves.


Beans Poriyal
Ingredients:
Beans - 250 gms
Mustard seeds - 1/2 tsp
Urad dal (split) - 1/2 tsp
Dried red chillies - 2
Red chilli powder - 1/4 tsp
Coconut (shredded) - 2 tbsp
Oil - 1/2 to 1 tsp
Salt - to taste

Method:
1. Wash and finely chop the beans into small round pieces.
2. Place the beans with 1/2 cup water in a pan/vessel. Cover and cook until the beans is soft yet firm to the touch.
3. Remove the beans in a bowl.
4. Heat oil in the same pan/vessel and splutter the mustard seeds. Break the red chillies into 1/2 inch pieces and add to the oil along with the spli urad dal. Mix for 10 seconds or so until the urad dal is slightly browned. Be careful not to burn them at this point.
5. Now add the cooked beans and mix well. Add the red chilli powder and salt and mix well. Taste to make sure the seasoning is right.
6. Let it fry for about 5 minutes while stirring continuously. Remove from stove and add the shredded coconut. Mix well and serve with hot rice and rasam.

Source:
Amma :)

Tuesday, September 6, 2011

Of Pancakes, Low Calorie Syrup and Labor Day

I have no idea why I even thought that this Fall Term would be an easy-breezy one. If anything, its been worse than the CORE term. But the Labor Day weekend was a welcome break from it all and more so because my sister was home :)

Somewhere along the week we had picked up a packet of instant pancake mix and decided to indulge ourselves to a typical American breakfast on Labor Day. The best part was that we had Low Cal syrup sitting at home for oh-so-long. I also managed to finally get my hands on the camera and tested out some shots. As per VJ, I did a pretty good job. What do you think?


Step 1: Mix batter with 1% low fat milk.


Step 2: Use a non-stick pan and ladle out generous dollops of batter on to heated pan.


Step 3: Flip them over after a minute or two to get nice golden brown pancakes.


Step 4: Remove in a plate and reach out for the low cal syrup


Step 5: Generously top your pancakes with 1 tbsp of low cal syrup and you're ready to start the day with a guilt-free yet tasty breakfast :)


Thursday, August 18, 2011

'Om Sweet 'Om

I'm back home!!!

We still have boxes to unpack to be officially moved-in and I have a barely functional kitchen now. VJ and myself made my famous alu ki sabzi and plain steamed rice for dinner yesterday after a hectic day of cleaning, unpacking, more cleaning, more unpacking and more cleaning and more unpacking...

I tested out the new camera and it's amazing. Can't wait for my photographer to follow me around the kitchen for pics while making endearing yummy noises :)

So on this encouraging note...I promise to be back soon with more recipes.

Sunday, August 7, 2011

Rajma - Chawal

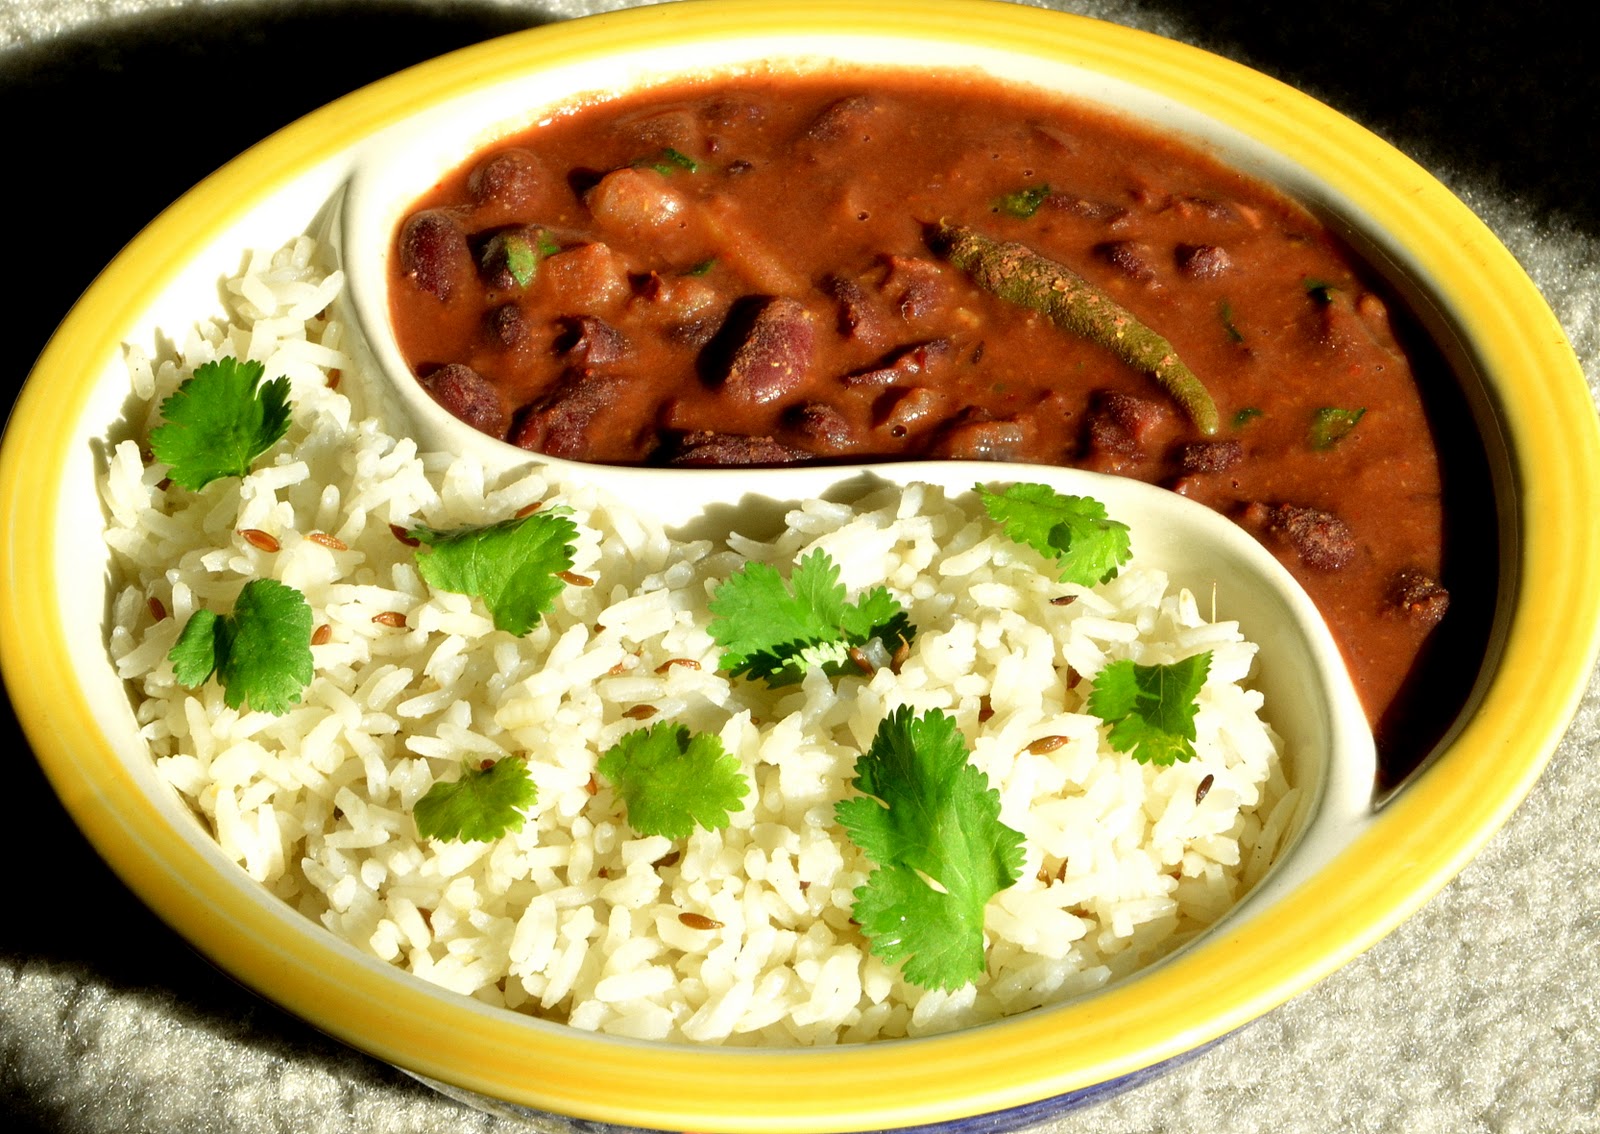
This may be a very standard recipe but like the dal tadka, I've made it so often that I've kind of gotten to a stage where I have a fool-proof recipe to follow and it comes out well all the time. Even if I am at work anf giving instructions to VJ over the phone, it still turns out good. Now that's something to be proud of I guess :)

A few thumb-rules I've learnt about rajma:
  • Soak it overnight, preferably in warm water. Throw away this soaked water
  • Rajma has more of ginger and less of garlic in it. Some people even avoid using garlic
  • You need lots of spicy green chillies for this
  • Rajma also uses very little tomato in its recipe
  • Use only MDH Garam Masala. I do not use any other brand and I swear only by MDH. It has the closest authentic taste to home-made garam masala. And this is a tip I learnt from a punjabi roommate of mine whose mom makes garam masala at home. So I believe in it whole-heartedly
  • Slow cooking the rajma in the masala is the best way to get the closest restaurant/dhabha kind of taste
  • Making rajma is not difficult at all, its actually a very easy recipe since its a staple punjabi curry/dal that's made very often at home

OK...onto the ingredients and the recipe itself.


Ingredients:
Rajma - 2 cups
Onions - 2 meduim size
Tomato - 1/2 to 1 medium size (if you're using Roma tomatoes, although they are tiny, use just 1)
Green chillies - 4 spicy hot
Ginger - 3 inch piece
Garlic - 1 clove
Chilli powder - 2 tsp
Dhaniya powder - 1 tsp
Garam masala - 3 tsp
Cumin - 2 tsp

Method:
1. Pressure cook the soaked rajma with enough water (double its amount, in this case 4 cups) for 2 whistles and then 15 mins on LOW. Switch off and leave on hot stove for the pressure to release.
2. Cut the ginger into thin long strips, crush the garlic, slit the green chillies, finely chop the onions and tomato.
3. Heat oil in a thick bottomed vessel and splutter jeera in it. Then add the onions and fry for two mins.
4. Now add the garlic, ginger and green chillies and fry until the onions are a little browned around the edges. Adding salt at this step will help fry the onions quicker.
5. Add tomatoes and cook until it is well blended. Then add all the masalas, including the garam masala. Fry for a minute.
6. Add 1 to 2 cups of water (use the water that is left over from the rajma in the pressure cooker). Cover and cook for 15 to 20 minutes. Make sure there is enough water.
7. Add the rajma to this, add salt and check for the seasoning. If the spices are lacking, you can add more garam masala at this stage. Mix well until well blended.
8. Set on LOW, cover and cook for 45 mins. Add more water in this stage based on how much of gravy you would like.

Serve with plain rice or jeera rice, pappad and plain dahi (yogurt) seasoned with jeera powder and salt.

Source:
I pretty much made up this recipe as I tried different variations. I don't have a particular source to cite.


Pics...you know the line...once I get home. Just one more week to go! Yay!

Update: Added pics...I got some awesome dishes for my food blog! :)

Monday, August 1, 2011

Poori & Bhaaji

This one's for my mom :)

Having to get two kids and a husband (with a good breakfast in their tummy and a tasty lunch packed for each) out of the door by 7 AM everyday for 15 years is no joke. That's why weekends were special when she took out extra time to make special treats like poori & bhaaji for us. To this day, when we're travelling and eat breakfast outside...I always order poori-bhaaji. Or poori-masal like the say in Tamil Nadu. So this recipe is for those typical family-weekends when I used to wake up to the smell of mom and dad making poori & bhaaji. Oh, how I miss home!


Bhaaji
Ingredients:
Potatoes - 8 or 10 medium sized
Onion - 2 medium sized
Tomatoes - 2 or 3 medium sized, based on tanginess ( I use hot house tomatoes usually)
Ginger - 3 inch piece
Green chillies - 4 to 6 spicy hot
Turmeric powder - 1/2 tsp
Red chilli powder - 1 tsp
Dhaniya powder - 1 tsp
Mustard seeds - 1 tsp
Urad dal - 2 tsp
Chana dal - 2 tsp
Oil - 3 to 4 tbsp
Salt to taste
Lemon juice - 1 tsp
Coriander leaves (finely chopped) - 1 tbsp

Method:
1. Boil potatoes in the cooker for at least 2 whistles. Cool, peel and mash well until it is smooth with few or very little lumps. Add salt to taste and mix well.
2. Chop the onions and tomatoes into small pieces. Cut the ginger into thin strips. Slit the green chillies.
3. Add 3 tbsp oil in a thick bottomed vessel and splutter the mustard seeds in it. Add the ginger and green chillies. Do NOT brown them. Mix for 30 seconds and immediately add the onions. This recipe does not require the ginger to be browned. The ginger has to retain some of its natural flavor to blend into the potatoes.
4. Fry the onions until they are transparent and very lightly browned around the edges. Now add the tomatoes and fry for 5 minutes. Again, you don't have to fry it until the oil separates. The nice thing about this recipe is not to fry or brown everything. The tomatoes also need to be a little tangy to give the potatoes that nice, unique taste.
5. Add all the masalas and mix for a minute. Make sure you don't burn the curry at this point.
6. Add 1/2 a cup of water and salt as needed. Taste to make sure the seasoning is right. The water is optional and it helps to mix the curry and the potatoes together. Otherwise it may be difficult to fold the potatoes into the curry. Switch off the stove.
7. Now add the mashed potatoes and mix well until it is well blended with the curry. At this stage you can add more water if needed. Taste to make sure the salt is right. Remember, we also added salt to the potatoes separately when we mashed them.
8. Let it cool for sometime. All the flavors would blend in well during this stage and it is important for the bhaaji to cool before adding the final seasoning.
9. Take the remaining 1 tbsp oil in a pan or small kadai. Fry the urad dal and chana dal in it without burning them. The trick here is not to wait until the oil is smoking hot. Just wait for a minute to heat the oil and immediately add the dal and let it slowly fry. Slow is good in this step. If you fry the dal in the initial step, it will not retain its fried, crispy, crunchy taste. That's why I like to fry it separately.
10. Now top the bhaaji with the dal fry tadka and mix well. Just before serving, add the lemon juice and top it with some freshly cut coriander leaves (optional).

Poori
Ingredients:
Whole wheat flour (atta) 2 cups
Coarse grained semolina (rava) - 2 tbsp
Sugar - 1 tbsp
Water as needed
Oil, for deep frying

Method:
1. Sift the flour and semolina along with the sugar in a sieve. Sifting just helps to mix it all well. The semolina and sugar helps to keep the pooris puff-up and remain so for slightly longer than when using just plain flour.
2. Add water as needed little-by-little and knead until the dough is firm. It should not be sticky.
3. Divide the dough into lemon sized balls, dust in dry flour and set aside.
4. Heat the oil in a deep kadai until just before smoking hot.
5. Using a rolling pin and more dry flour as needed, roll out the balls into round thick pancakes. It has to be thick otherwise it will not puff up. Don't roll them out as thin as phulkas or chappatis.
6. Test whether the oil is hot enough with a small pinch of the dough. It should rise up immediately and not stick to the bottom or struggle to rise up.
7. Slowly slide in one pancake and press-down slightly into the oil with a slotted spoon until the pancake puffs up. Flip over and fry for 30 seconds. Flip over again and fry for 10 seconds.
8. Drain excess oil and remove using the slotted spoon onto a plate with paper towels. Repeat step 7 for each pancake. Serve immediately while hot and puffy with the bhaaji.

Source:
Mommy dearest :)

I do not want to end on the same lame line as the previous ones...but seriously, pics to follow soon once I get back home! 10 more days...yay!